

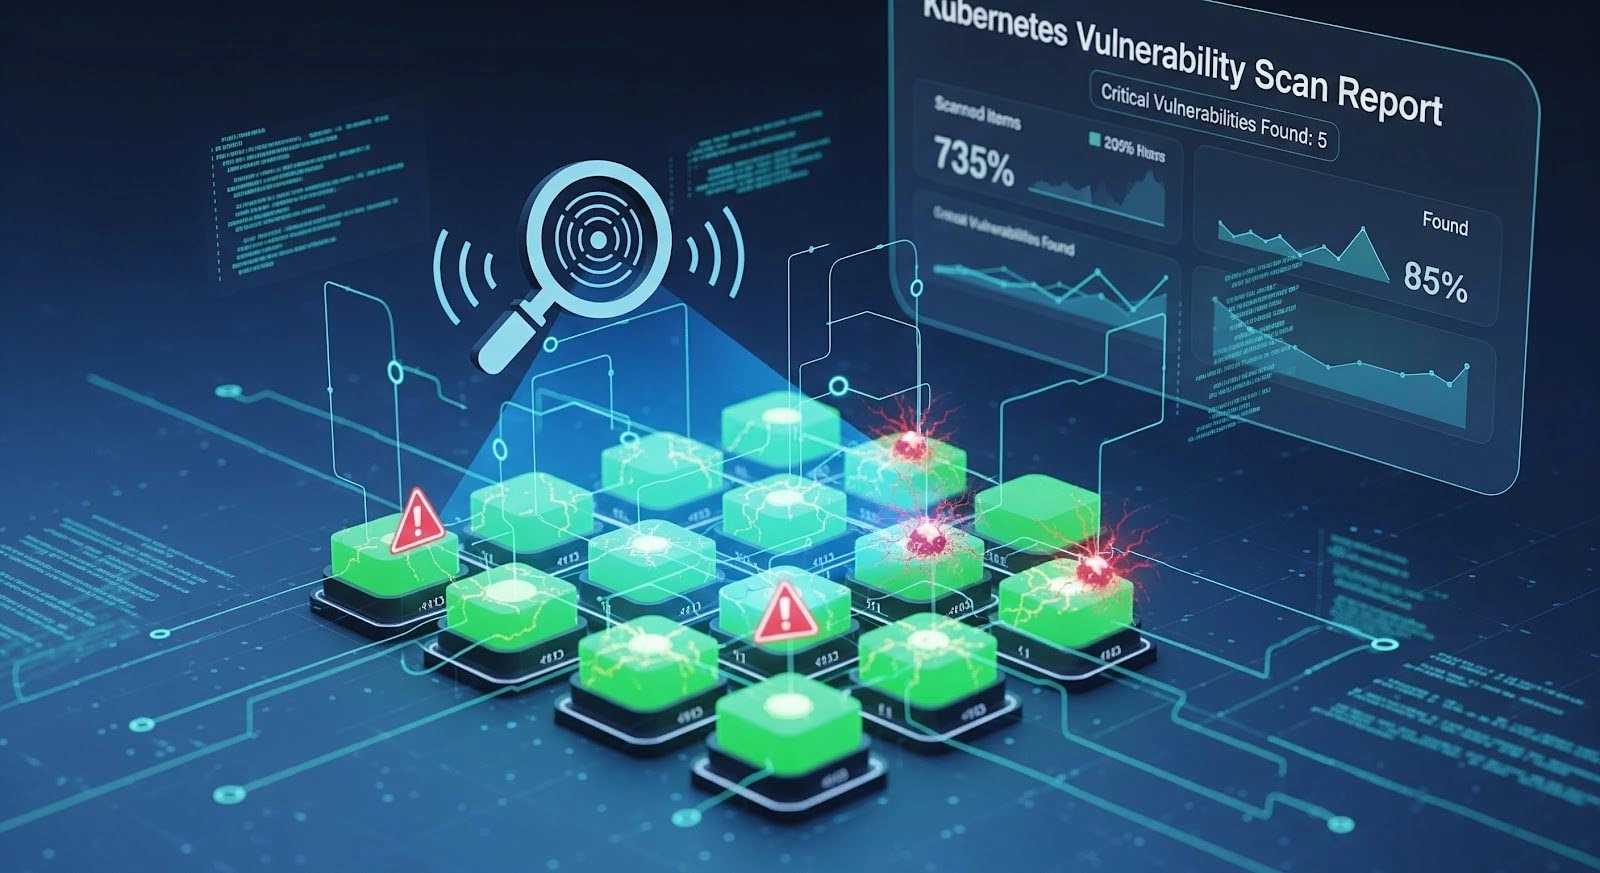
Most security teams get stuck after running Kubernetes vulnerability scans because they lack a systematic way to decide what actually threatens production— a gap we see constantly in 10 years of Kubernetes consulting work.
You've probably seen it too: your scanner surfaces hundreds of findings. The scan finishes. Now you're stuck answering the only question that actually matters: which of these vulnerabilities poses real risk in your runtime environment? We've watched security teams spend weeks patching low-risk CVEs while genuinely exploitable vulnerabilities sit live in production.
If you're looking for a practical way to reduce 200 CVEs to 20 actionable fixes, you're in the right place. Here's what we’ll recommend:
- First, categorize vulnerabilities so you understand the 5 types and which ones actually enable breaches (hint: it's not the 80% flooding your reports)
- Second, detect risks across multiple stages from build to runtime, so nothing slips through without blocking every deployment
- Third, prioritize using a four-tier framework that tells you which findings to fix today, this sprint, next quarter, or never
- Finally, remediate by type using architectural fixes that eliminate entire vulnerability categories instead of patching the same issues quarterly
Let’s begin!
Understand the Vulnerability Categories (and Why They’re Not Equal)
In a typical scan of a production Kubernetes environment, the distribution volume is typically skewed. Most findings come from container image CVEs, while the highest-risk issues often appear far less frequently. Understanding this distribution and how risk differs across them is the first step toward intelligent prioritization.

Detect Kubernetes Vulnerabilities at Each Stage of Development
One-time scans don't cut it. We learned this the hard way when a client's "clean" image from three months prior suddenly had 47 critical CVEs—not because anything changed in their code, but because new vulnerabilities were disclosed against packages that had been sitting there the whole time.
You need continuous detection at multiple lifecycle stages. But there’s a dilemma: scan too aggressively, and you become the team that blocks every deployment. Scan too loosely, and you're just generating reports nobody acts on.
We've landed on a four-stage approach that catches real issues without turning security into a bottleneck.
Stage 1: Build-Time Scanning (Shift Left)
This is where most teams start, because it's the earliest point where you can catch known CVEs before they ever reach production. We typically integrate an image vulnerability scanner like Trivy or Grype directly into CI/CD pipelines, running right after docker build but before docker push. The command is straightforward:
The --exit-code 1 flag fails the build when it finds high or critical vulnerabilities.
Teams get into trouble when they set this up. It blocks a deployment on day one, a developer bypasses it to ship a hotfix, and suddenly everyone's learned that security checks are obstacles to route around.
The trick is calibrating your failure threshold. We usually start with blocking only on critical CVEs that have available patches. If there's no patch, blocking the build just creates frustration—the developer literally cannot fix it. Over time, as teams mature, you can tighten the threshold.
One thing to keep in mind is that build-time scanning only catches what's known at build time. It can't detect runtime-specific vulnerabilities or misconfigurations in how you deploy the image. That's what the other stages are for.
Stage 2: Registry Scanning (Continuous Monitoring)
Here's a scenario we see constantly. A team builds an image in January, it passes all scans, ships to production, and everyone moves on. In March, a critical CVE is published affecting a library in that image. The image hasn't changed, but its risk profile has completely changed.
Registry scanning catches this. Tools like Harbor, AWS ECR's native scanning, or Anchore continuously re-scan images in your registry, typically every 24 hours. When a new critical CVE affects a deployed image, you get an alert.
However, setting up the scanning is the easy part. The difference between registry scanning that works and registry scanning that generates ignored reports comes down to two things.
First, configure webhooks that reach the right people. We typically pipe high-severity findings directly into Slack channels or PagerDuty, depending on severity. A dashboard nobody checks is the same as no scanning at all.
Second, tie registry findings back to what's actually running. Knowing that nginx:1.24 has a new critical CVE is useful. Knowing that nginx:1.24 has a new critical CVE and it's currently running in your production payments namespace is actionable. Most registry scanners can integrate with your cluster to show this mapping—take the time to set it up.
Stage 3: Pre-Deployment Validation (Admission Control)
Build-time scanning catches issues in your CI/CD pipeline. But what about the developer who runs kubectl apply directly? Or the Helm chart that gets deployed with default values that happen to be insecure?
Admission controllers are your safety net. Kubernetes security tools like OPA Gatekeeper or Kyverno intercept requests to the Kubernetes API and validate them against your security policies before anything gets created.
A simple Kyverno policy to block privileged containers looks like this:
We've seen this catch issues that made it through every other check—usually from manual deployments or third-party Helm charts with questionable defaults. One client had a monitoring tool that required privileged access in its default configuration. Their CI/CD pipeline never touched it because it was deployed via a vendor-provided Helm chart. The admission controller caught it, and they worked with the vendor to find a non-privileged alternative.
The important thing is to start in audit mode before switching to enforcement. Flipping admission control to "deny" without understanding what it'll block is a fast way to cause an outage and lose organizational trust in your security tooling.
Stage 4: Runtime Scanning and Monitoring
Static scans (everything we've covered so far) analyze what's in your images and manifests. But they can't tell you what's actually happening inside a running container.
Runtime monitoring tools like Falco use eBPF to observe system calls and container behavior in real time. They detect things like:
- A container spawning a shell when it should only run your Node.js app
- Unexpected network connections to external IPs
- Attempts to read sensitive files like /etc/shadow
- Privilege escalation attempts
We had a situation where a client's container was compromised through a zero-day in a web framework. Since the vulnerability wasn’t public yet, static scans couldn't have caught it. But Falco flagged the anomaly when the container started making outbound connections to IP addresses it had never contacted before. That early detection let them isolate the container before the attacker could move laterally.
Runtime monitoring is your last line of defense. It catches what everything else misses, such as zero-days, novel attack patterns, and insider threats.
Making It Work Together
Each stage catches different things:
The goal isn't to implement all four stages on day one. Start with build-time scanning, get that working reliably, then add sophistication as your team's security maturity grows. We've seen teams try to deploy everything at once and end up with a fragile, over-complex system that nobody trusts.
Prioritize Vulnerabilities Based on Production Risk
Running your first Kubernetes vulnerability scan and seeing hundreds of CVEs is normal. Scanners report everything they can detect, without context about how your system actually behaves in production.
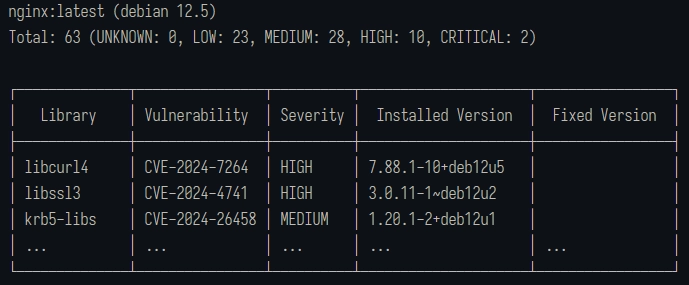
For example, running Trivy against a standard nginx base image typically returns 60+ vulnerabilities before you have written a single line of application code. Those findings come from OS packages and bundled libraries included in the image, not mistakes in your code.
Scan results are inflated for a few structural reasons:
- No runtime context: Scanners flag vulnerable packages based on presence, not usage. A critical CVE is reported even if your application never executes the affected code path.
- Noise you cannot act on immediately: Results include vulnerabilities in unused dependencies, duplicate findings across base image layers, and CVEs with no available patches. These increase counts without creating actionable work.
- No indication of remediation effort: A one-line package update, a breaking dependency upgrade, and an architectural change are treated as equivalent, despite having very different costs and risks.
A scan that reports 200 CVEs usually contains a much smaller subset that are exploitable, relevant, and fixable. Raw CVE counts should not be treated as a remediation plan, but as inputs into a prioritization process.
That distinction is what the prioritization framework addresses.
Tier 1: Exploitable in Your Environment (Fix Immediately)
These are vulnerabilities where three things are true simultaneously: there's a public exploit available, the vulnerable code path is reachable in your deployment, and an attacker can reach the vulnerable component from the network.
This is your "stop what you're doing" tier. These vulnerabilities represent active risk to your production environment right now.
To identify Tier 1 vulnerabilities, we cross-reference scan results against exploit databases like Exploit-DB and check if the vulnerability has a Metasploit module. Then we verify whether our application actually executes the vulnerable code path. A Kubernetes CVE in a JSON parsing library matters if your service accepts JSON input. It doesn't matter if that library came bundled with your base image, but your code never touches it.
Realistically, out of 200 CVEs, you might have 5-10 that qualify for Tier 1. Sometimes zero. That's the point—most vulnerabilities aren't actively exploitable in your specific context.
Timeline: 24-48 hours. If something is genuinely Tier 1, it jumps the queue.
Tier 2: Patchable Critical CVEs (Fix This Sprint)
Tier 2 covers high-severity vulnerabilities (CVSS 7.0+) where a patch exists and applying it won't break your application.
These aren't immediately exploitable, or the exploit path isn't clear, but they're serious enough that leaving them unpatched is accumulating risk. A new exploit technique could emerge, or your network configuration could change. The assumptions that kept this vulnerability theoretical could become a reality.
Identification is more straightforward than Tier 1. Filter your scan results for HIGH and CRITICAL severity, then check the "Fixed Version" column. If there's a fixed version and it's a minor or patch release (not a major version jump), it's probably Tier 2.
We usually batch these into sprint work. Dedicate a day each sprint to working through Tier 2 vulnerabilities, or assign them as secondary tasks when developers have slack time. What you want is consistent progress—Tier 2 items shouldn’t sit untouched for months until they become Tier 1 problems.
Timeline: 7-14 days. Address within the current sprint.
Tier 3: Architectural Vulnerabilities (Fix the Pattern)
Some findings aren't individual bugs to patch. They're symptoms of architectural decisions that keep creating vulnerabilities.
Hardcoded secrets are Tier 3. You could fix each instance as it's found, but you'll be playing whack-a-mole forever. The right fix is implementing proper secrets management, so the vulnerability category disappears entirely.
Containers running as root are Tier 3. It’s the same story—you can fix them one by one, or you can establish pod security standards that prevent the pattern. Similarly, long-lived credentials in CI/CD pipelines are also Tier 3. Stop rotating keys and start using OIDC federation to eliminate static credentials.
We spend a lot of time on Tier 3 with our clients because this is where the leverage is. Patching 50 individual CVEs is 50 units of work that you'll repeat next quarter. Fixing the architectural pattern that caused those CVEs is more work upfront, but pays dividends permanently.
Examine your scan results for patterns. If you're seeing the same type of finding across multiple services, that's a Tier 3 candidate. When we implemented SOPS with Kubernetes and ArgoCD for a Pelotech client, their "hardcoded secrets" findings dropped from 47 to zero. We didn’t fix 47 things—we simply made that category of vulnerability impossible.
Timeline: 2-4 weeks, but schedule it. Tier 3 work is easy to defer because it's not urgent. It's also the highest-value security work you can do.
Tier 4: Accept or Defer (Document the Decision)
Some vulnerabilities don't have patches. Others are in components you're decommissioning next month. And even more have a CVSS score that sounds scary, but an exploit path so convoluted it's basically theoretical.
Tier 4 isn't "ignore"—it's "consciously accept the risk and document why."
For each Tier 4 item, we record the CVE, why it's being deferred (no patch available, component being deprecated, compensating controls in place), what those compensating controls are, and when we'll revisit the decision.
Documentation is important. Six months from now, someone will ask why CVE-2024-XXXXX isn't fixed. "We decided to accept the risk" isn't an answer. "We accepted the risk because there's no patch, the component is behind a WAF that blocks the exploit vector, and we're migrating off this service in Q3" is an answer.
Applying the Framework
When you run this against a typical scan of 200 vulnerabilities, you end up with something like:
- Tier 1: 5-10 items for immediate action
- Tier 2: 15-25 items remediated during sprint work
- Tier 3: 3-5 patterns become planned projects
- Tier 4: 150+ items are documented for acceptance
That Tier 4 number looks high, and it should. Most CVEs in a scan either don't affect your environment, don't have patches, or represent such low actual risk that fixing them is worse than accepting them. Rather than reduce your vulnerability count, the framework tells you which vulnerabilities deserve your limited time.
When your manager asks which 20 things to fix? Now you have an answer.
Remediate Each Vulnerability Category the Right Way
Different vulnerability types need different remediation approaches. Patching a container image CVE is a completely different workflow than fixing hardcoded secrets or RBAC over-permissioning. We're going to walk through each type with both a quick fix (get it done today) and a proper fix (solve it permanently).
Type 1: Hardcoded Secrets (CWE-798)
Scanners flag AWS access keys, database passwords, API tokens, and private keys embedded in container images, environment variables, or source code—usually as CWE-798. We put this first because it's the vulnerability type most likely to compromise your infrastructure. Attackers don't need sophisticated exploits when credentials are sitting in your Dockerfile.
Quick fix (1-2 days): Move secrets to Kubernetes Secrets and reference them as environment variables in your pod specs.
This removes secrets from your images and source code immediately. It's not perfect—Kubernetes Secrets are base64 encoded, not encrypted—but it's much better than hardcoded values, and you can implement it today.
Proper fix (1-2 weeks): Implement encrypted secrets management with SOPS and ArgoCD.
We've written about this extensively because it's one of the highest-leverage security improvements you can make. SOPS encrypts your secrets in Git using age or AWS KMS, and ArgoCD decrypts them at deploy time using the KSOPS plugin. Your secrets are encrypted at rest in your repository, encrypted in transit, and only decrypted inside your cluster.
The workflow looks like this:
- Create your secret YAML as normal
- Encrypt it with SOPS: sops -e secret.yaml > secret.enc.yaml
- Commit the encrypted file to Git
- ArgoCD decrypts automatically during sync
What makes this a proper fix is that it eliminates the vulnerability category entirely. Secrets live encrypted in Git, which means your repository can be public (though we don't recommend it) without exposing credentials. There's nothing to scan for because plaintext secrets don't exist anywhere in your pipeline.
Alternative tools: HashiCorp Vault, AWS Secrets Manager with External Secrets Operator, Sealed Secrets.
Type 2: Long-Lived Credentials in CI/CD
Static AWS access keys, service account tokens, and API credentials stored in CI/CD systems get flagged when they appear in build logs or environment dumps. CI/CD credentials typically have broad permissions because they need to deploy infrastructure, which means a leaked CI/CD credential is often worse than a leaked application credential.
Quick fix (1 week): Implement credential rotation. If you must use static credentials, rotate them regularly and use separate credentials per environment with minimal required permissions.
This reduces the blast radius and limits the window of exposure, but it's operational overhead that scales poorly. Every rotation is a manual process or a script you need to maintain.
Proper fix (2-3 weeks): Eliminate static credentials with OIDC federation. OIDC (OpenID Connect) lets your CI/CD system authenticate directly with AWS (or GCP, or Azure) without storing any credentials. GitHub Actions, GitLab CI, and CircleCI all support this natively.
For GitHub Actions deploying to AWS, the setup involves:
- Create an OIDC identity provider in AWS IAM pointing to GitHub
- Create an IAM role that trusts tokens from your specific repository
- Reference the role in your workflow:
There are no access keys, which means nothing to rotate or leak. The credentials are generated on demand, scoped to the specific workflow run, and expire automatically.
Alternative approaches: Vault dynamic secrets, cloud-native workload identity.
Type 3: Unpatched Container Image CVEs
Known vulnerabilities in OS packages and application dependencies within your container images dominate your scan results. Remediation approach varies based on what's actually vulnerable—a one-line package update versus a major version migration versus waiting on upstream maintainers who haven't released a patch.
Quick fix (hours to days): Update the specific package. If the CVE is in an application dependency, update your requirements.txt, package.json, or go.mod and rebuild. If it's in an OS package, you can sometimes update it directly in your Dockerfile:
This works for one-off fixes but doesn't scale. You'll be doing this every time a new CVE drops.
Proper fix (1-2 weeks setup, then ongoing): Configure Dependabot or Renovate to automatically create pull requests when new versions of your dependencies are available:
This configuration auto-merges patch updates and flags security vulnerabilities with a label. Your scan results continuously improve without manual intervention.
For base images, consider distroless or minimal images, which have fewer packages to begin with. The standard nginx image has 65 vulnerabilities. The nginx-unprivileged Alpine slim variant has around 2. Chainguard's nginx image often has zero. Fewer packages mean fewer CVEs.
Pro Tip: Sliplane regularly scans popular Docker images and publishes the results.
When there's no patch: Document it as Tier 4, implement compensating controls (network policies, WAF rules), and set a reminder to check back. Sometimes there’s nothing to do but wait on upstream maintainers.
Type 4: Kubernetes Misconfigurations
Typical enablers include Containers running as root, missing security contexts, privileged mode enabled, and missing resource limits. That medium-severity CVE becomes a cluster compromise when the container is running as root with host network access.
Quick fix (minutes per deployment): Add security context to individual pod specs.
This works but requires updating every deployment, and there's nothing stopping someone from deploying without it.
Proper fix (1-2 weeks): Enforce Pod Security Standards at the namespace level. Kubernetes has built-in pod security admission that enforces security contexts automatically:
The restricted profile blocks privileged containers, requires non-root users, and drops capabilities by default. Any pod that doesn't meet the requirements gets rejected at admission.
For more granular control, Kyverno or OPA Gatekeeper lets you define custom policies. We typically start with Kubernetes-native pod security admission and layer in Kyverno for organization-specific requirements.
Type 5: RBAC Over-Permissioning
Service accounts with cluster-admin privileges, overly broad role bindings, and default service accounts with non-default permissions turn a single compromised pod into a cluster-wide incident. RBAC issues are invisible until something else goes wrong, and then they make everything worse.
Quick fix (hours): Manually restrict the specific service account. Audit what permissions the workload actually needs, create a role with just those permissions, and bind it to a dedicated service account:
Proper fix (2-4 weeks): Store all RBAC definitions in Git and deploy them through ArgoCD. Enable pruning so that any RBAC resources created outside of Git get automatically removed:
This creates an audit trail (Git history shows who changed what and when) and prevents configuration drift. Nobody can quietly grant themselves cluster-admin because ArgoCD will revert it on the next sync.
Combine this with regular RBAC audits using kubectl auth can-i --list or tools like KubiScan to identify accounts with dangerous permissions you didn't know about.
Kubernetes Vulnerability Management is Easier With The Right Approach
The framework we've covered gives you a systematic path to Kubernetes cluster security. Detect across multiple stages so nothing slips through. Prioritize using the four tiers, so you know what matters. Remediate by type, investing in architectural fixes that eliminate entire vulnerability categories rather than patching the same issues quarter after quarter.
Teams that implement this consistently stop dreading their vulnerability reports. The scan results become inputs to a process, not emergencies to react to.
If you're just getting started, begin with build-time scanning and one prioritization pass through your existing findings. Pick one Tier 3 pattern—secrets management is usually the highest leverage—and solve it properly. Layer in registry scanning and admission control once the foundation is solid.
For teams managing complex environments or preparing for compliance certifications, Pelotech has implemented this framework across GovCloud environments, fintech platforms, and scaling startups. If you'd like help building a prioritized roadmap for your situation, reach out for a security architecture review.